1. Introduction: Mastering Machine Embroidered Lettering
From monogrammed shirts to personalized gifts and branded merchandise, machine-embroidered lettering is everywhere—adding a touch of individuality and professionalism to fabric creations. Whether you’re looking to elevate your apparel, craft heartfelt gifts, or make your business stand out, mastering the art of stitching flawless letters with a machine opens up a world of creative possibilities.
In this guide, we’ll walk you through the essentials: setting up your embroidery machine, selecting the right fonts, executing precise stitches, and troubleshooting common pitfalls. With best sewing machine for embroidery and sewing and a few expert techniques, you’ll discover how to achieve crisp, consistent lettering—no matter your fabric or project. Ready to transform your embroidery? Let’s dive in and unlock the secrets to flawless machine-embroidered letters.
Table of Contents
- 1. Introduction: Mastering Machine Embroidered Lettering
- 2. Machine Setup Fundamentals for Letter Embroidery
- 3. Design Execution: From Thread to Stitch
- 4. Stitch Technique Comparison for Different Fabrics
- 5. Troubleshooting Common Letter Embroidery Issues
- 6. Advanced Techniques: Digitization and Special Effects
- 7. Conclusion: Elevating Your Letter Embroidery Mastery
- 8. FAQ: Machine Embroidery Letters
2. Machine Setup Fundamentals for Letter Embroidery
Before you can stitch out those crisp, professional letters, your setup needs to be spot on. The foundation of great machine embroidery lettering lies in how you prepare your fabric, select your hoop, and align your design.
2.1 Hooping Techniques and Fabric Stabilization
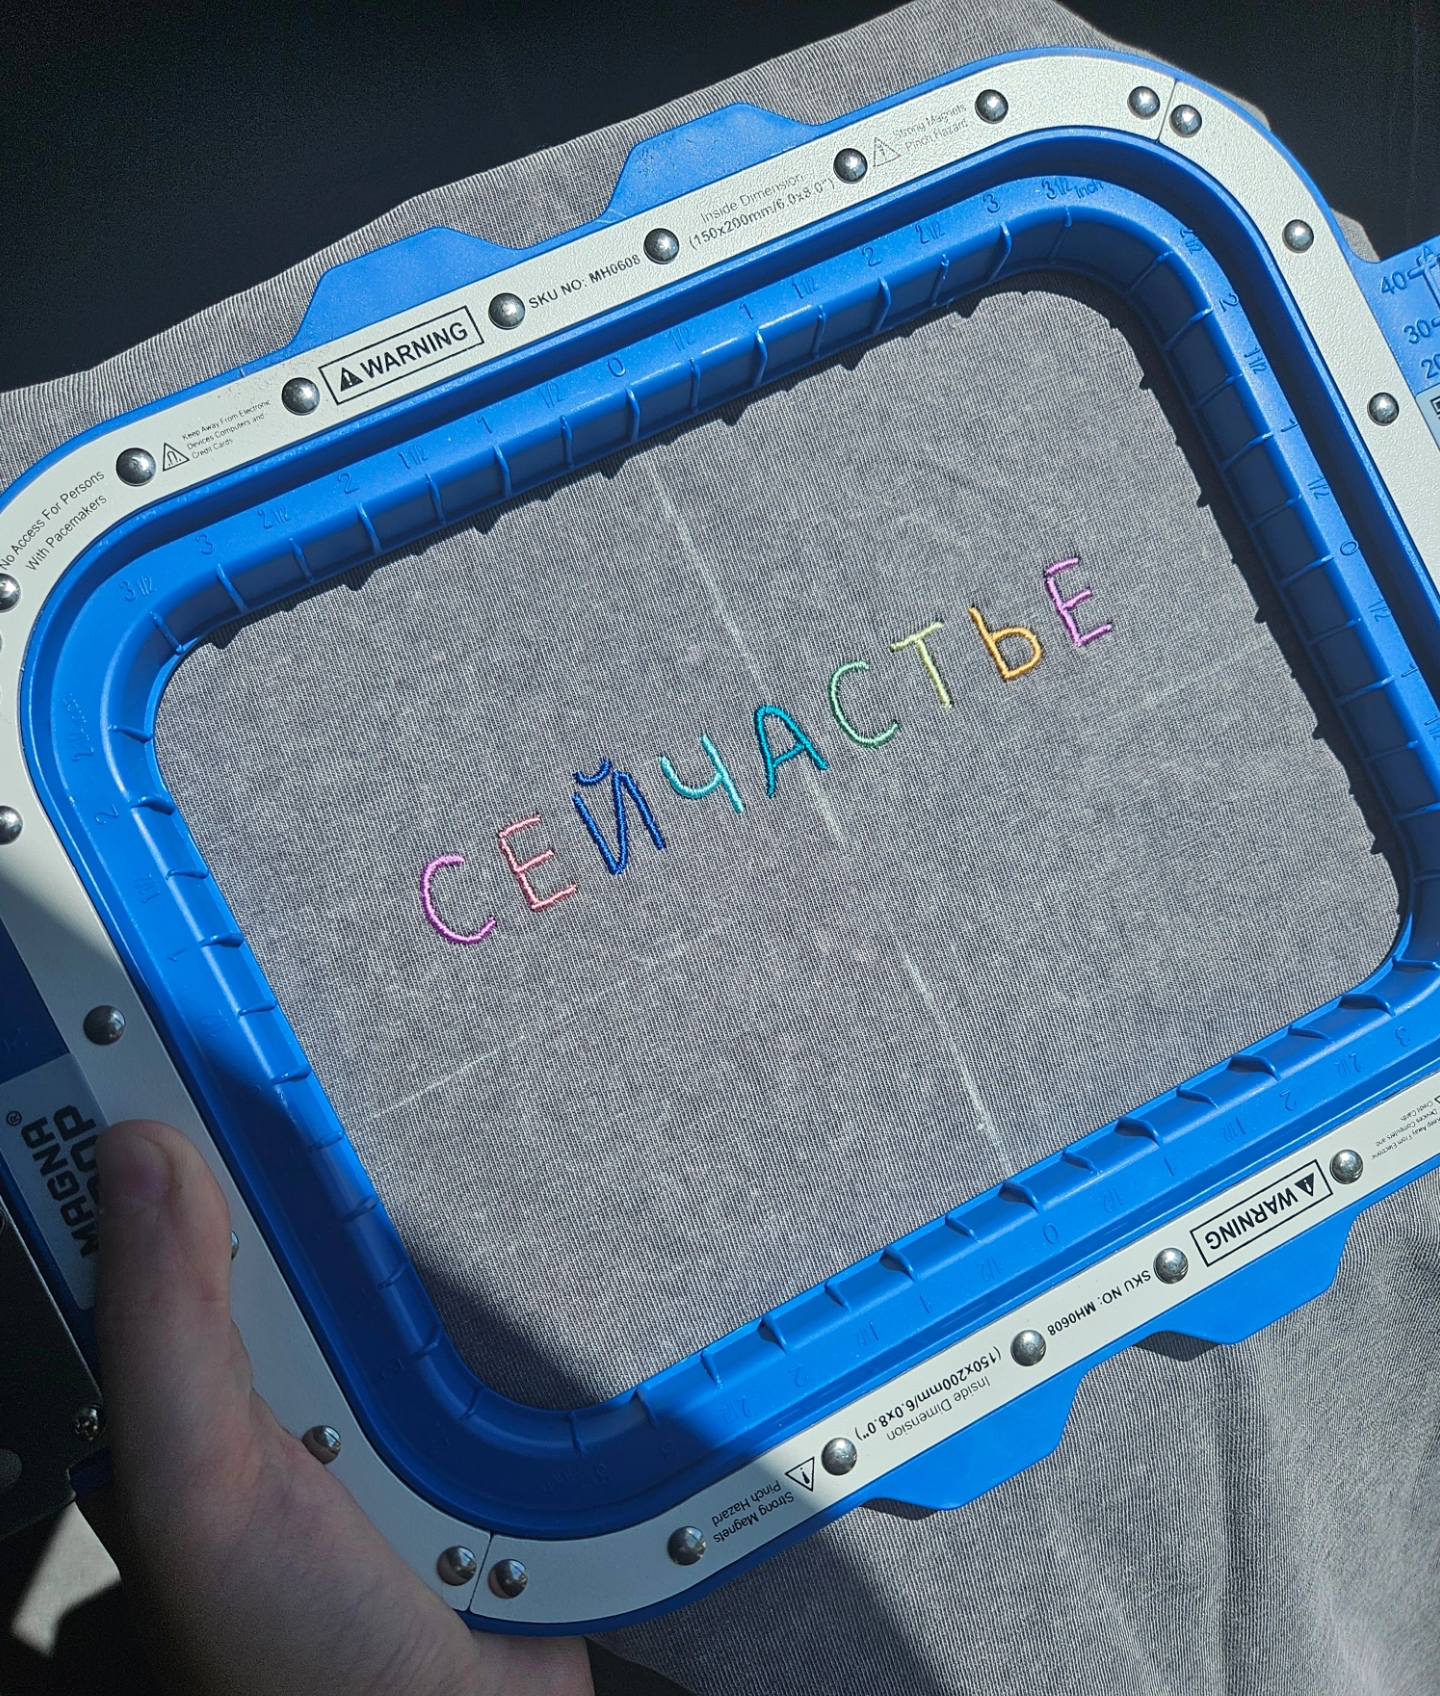
Let’s start with the unsung hero of embroidery: the hoop. The choice between magnetic and traditional hoops can make or break your lettering—literally.
Magnetic vs. Traditional Hoops
Traditional hoops rely on manual screw tension, which can be fiddly and inconsistent, especially with thicker or stretchy fabrics. Magnetic machine embroidery hoops, like those from Sewtalent, use powerful magnets to secure the fabric evenly and quickly. This not only speeds up the hooping process but also helps maintain consistent tension across the fabric, which is crucial for preventing letter misalignment and distortion.
Why does tension matter so much? Uneven tension can cause puckering, shifting, or even warped letters—turning “Hello” into “H3ll0” in the blink of an eye. Magnetic hoops excel here, providing even pressure that keeps your fabric stable throughout the stitching process.
Stabilizer Selection: The Unsung Backbone
Think of stabilizers as the scaffolding for your embroidery. The right choice depends on your fabric:
- Cut-away stabilizers are your go-to for knits and stretchy materials (like t-shirts or sweatshirts). They provide permanent support, preventing your letters from stretching out or distorting over time.
- Tear-away stabilizers are best for stable woven fabrics. They’re easy to remove after stitching, leaving your work neat and comfortable.
- Wash-away stabilizers are perfect for sheers or delicate projects where you don’t want any leftover backing.
Pro tip: Always fuse your stabilizer to the fabric when possible. This extra step helps prevent shifting and ensures your letters stay sharp and aligned.
Quality Matters
Avoid bargain-bin stabilizers with inconsistent density—they can sabotage your results. Invest in premium stabilizers from reputable embroidery suppliers for reliable performance.
Final Hooping Checklist:
- Choose the smallest hoop that fits your design for maximum stability.
- Set the correct hoop size in your machine’s settings to avoid placement errors.
- Use the machine’s trace function to preview and fine-tune your letter placement before stitching.
By combining a magnetic hoop with the right stabilizer, you set yourself up for distortion-free, professional-looking letter embroidery—every time.
2.2 Font Selection and Digital Alignment Tools
Now, let’s talk about the digital side of things: fonts and alignment.
Built-in Font Libraries & Numerical Input
Most modern embroidery machines come loaded with built-in font libraries. Access these through your machine’s menu, where you’ll often find a numerical input system—each letter is assigned a code for quick selection. For example, spelling “happy” might involve entering codes like H-A (0101), P (1616), P (1616), and Y (25). This system streamlines the process and ensures accuracy, especially for longer words.
Digital Alignment: Getting Placement Perfect
Precise placement is everything in lettering. Machines offer on-screen grids and alignment tools, allowing you to nudge and tweak each letter’s position. Remember: once you confirm the group, most machines lock the letters together, so get your placement right before hitting “go.”
Trace Function: Your Pre-Stitch Safety Net
The trace function lets your machine outline the design area without stitching, giving you a visual check to ensure your letters are centered and won’t run off the fabric. Use this feature religiously—it’s the embroidery equivalent of “measure twice, cut once.”
Font Size Limitations
Font size matters, especially in relation to your fabric type. Small, intricate fonts may not stitch well on thick or textured fabrics, while large, bold fonts can overwhelm delicate materials. Always test stitch on a scrap of your chosen fabric to see how your selected font and size perform.
By leveraging your machine’s digital tools and understanding the relationship between font, fabric, and size, you’ll achieve clean, readable, and beautifully aligned letters—no guesswork required.
3. Design Execution: From Thread to Stitch
With your setup dialed in and your design perfectly aligned, it’s time to bring those letters to life. This stage is all about the details: thread choice, tension, and mastering the stitches that give your letters their signature look.
3.1 Thread Selection and Tension Calibration
Thread Type: Cotton vs. Polyester
Thread isn’t just thread—different types behave in unique ways. Cotton threads, such as Brothreads, usually 30–50 weight, have a natural elasticity that can cause puckering if tension is too tight. Polyester threads, ranging from 40–120 weight, offer less stretch and are more forgiving on a variety of fabrics. For small, detailed letters, a finer 60-weight thread paired with a small needle (like 65/9) delivers crisp, precise results.
Specialty Threads
Metallic threads add shine but are delicate and prone to breakage under high tension. Nylon threads are strong and durable but may require higher tension to form tight, secure stitches.
Tension Calibration: The Balancing Act
Tension is the invisible force behind every perfect stitch. Adjust your machine’s tension using the dial or knob—clockwise for more tension, counterclockwise for less. Always consult your machine’s manual for specifics.
To check your tension, run a test stitch and inspect the back:
- Loops or puckering? Tension is too loose.
- Thread breakage or fabric distortion? Tension is too tight.
Some pros use tension gauges for precision, but a simple "pull test"—drawing six inches of thread through the needle and feeling for resistance—can work wonders.
Troubleshooting Common Issues
- Looping: Lower the top thread tension.
- Breakage: Check for burrs on the needle, re-thread the machine, and ensure you’re using the right thread for your fabric.
Test your setup on the same fabric and stabilizer you’ll use for your final piece. This extra step can save you from headaches (and wasted material) down the line.
3.2 Mastering Satin Stitch for Letterforms
The satin stitch is the superstar of embroidered lettering, creating smooth, dense, and eye-catching letters.
Step-by-Step Satin Stitch Execution
- Machine Settings: Select the zigzag or satin stitch mode. Some machines offer a "buttonhole" setting for straight-line satin stitches.
- Presser Foot: Use a satin stitch foot (often labeled "Foot A"), which has a gap underneath to glide smoothly over dense stitches.
- Thread Management: Pull both top and bobbin threads to the fabric surface before starting. Hold them taut for the first few stitches to prevent tangling.
- Start Slow: Use the hand wheel for the initial stitches to ensure precise placement, especially on small or intricate letters.
- Density Adjustments: For small letters (under 4mm tall), keep the column width around 1.4mm for wovens and up to 1.2mm for knits. Openings inside letters (like "O" or "A") should be at least 0.8mm wide to avoid closing up.
Tips for Flawless Satin Stitch Letters
- Lower tension slightly compared to regular sewing to accommodate the dense thread build-up.
- Skip underlay stitches for tiny letters to avoid bulk.
- Use short travel stitches (about 1.5mm) between letter elements to keep thread paths invisible.
Quality Control
Test your satin stitch on scrap fabric first. Adjust density and tension as needed to prevent "bird nesting" (tangled threads underneath) or thread breaks.
By carefully selecting your thread, calibrating tension, and mastering the satin stitch, you’ll achieve professional-quality lettering that stands out—literally and figuratively—on any project.
Ready to take your lettering to the next level? Keep these fundamentals in your toolkit, and you’ll be stitching flawless letters with confidence, creativity, and consistency.
4. Stitch Technique Comparison for Different Fabrics
When it comes to embroidering letters, the stitch technique you choose can make or break your results—especially as you move between fabrics as different as crisp cotton, plush towels, or stretchy knits. Let’s unravel the secrets behind satin and fill stitches, and how to optimize your approach for every material.
4.1 Satin Stitch vs Fill Stitch: When to Use Each
If you’ve ever admired the smooth, glossy finish of embroidered monograms or the bold, blocky letters on a towel, you’ve already seen the power of stitch selection in action. But which technique should you use, and when?
Satin Stitch: The Go-To for Fine Detail and Narrow LettersSatin stitching is like the sports car of embroidery—sleek, fast, and designed for precision. It uses closely spaced, parallel stitches to create a shiny, raised effect that’s perfect for small or narrow letterforms. The result? Crisp, elegant letters that catch the light and stand out on stable, non-stretchy fabrics like cotton, denim, or canvas.
- Best for: Small-scale text (under 12mm in height), outlined fonts, and monograms on stable fabrics.
- Why it works: The tight, parallel structure delivers clean edges and high visibility, maintaining readability even at reduced sizes.
- Limitations: When stretched too wide, satin stitches can become loose or snag—think of trying to bridge a canyon with a single plank. For large letters, this can mean droopy, vulnerable stitches.
Fill stitching, on the other hand, is your heavy-duty pickup truck—built to cover ground and handle tough terrain. It uses a series of directional stitches to fill larger areas, distributing tension evenly and providing texture and durability.
- Best for: Large letters (above 25mm), bold fonts, and fabrics that need extra coverage—like towels, fleece, or textured knits.
- Why it works: The distributed stitch pattern flexes with the fabric, resists puckering, and stands up to repeated wear and washing.
- Limitations: Fill stitches can look less refined on small text, sometimes appearing crowded or indistinct.
Here’s a quick reference to help you match stitch to substrate:
| Fabric Type | Satin Stitch | Fill Stitch |
|---|---|---|
| Cotton/Denim | Excellent (small/narrow letters) | Good (large/bold letters) |
| Canvas | Excellent | Good |
| Stretchy Knits | Challenging (risk of distortion) | Best (handles movement) |
| Towels/Fleece | Not ideal (can “float” on pile) | Excellent (anchors well) |
| Sheers/Voile | Use with care (short stitches, low density) | Use with care (reduce density) |
4.2 Fabric-Specific Optimization Strategies
Every fabric has its quirks, but with a few strategic tweaks, you can achieve flawless lettering across the board.
Sheer and Lightweight Fabrics- Reduce Stitch Density: Too many stitches can overwhelm delicate fabrics, causing puckering or distortion. Lighten up your density settings and use finer threads.
- Needle Choice: A sharp, small needle (like 65/9) minimizes holes and keeps your letters crisp.
- Increase Stabilizer: More is more here. Use extra stabilizer to support the plush surface and prevent the design from sinking.
- Thread Weight: Opt for heavier threads (like 40wt) to ensure your letters rise above the pile and remain visible.
- Stabilizer is Non-Negotiable: Always use a cut-away stabilizer for permanent support.
- Stitch Type: Fill stitches distribute tension and flex with the fabric, making them the safer bet for activewear or t-shirts.
For embroidering on sweatshirts, an embroidery machine for sweatshirts with the right settings is essential.
Woven Cottons and Poplin- Both Stitches Welcome: These beginner-friendly fabrics play nicely with both satin and fill stitches. Just match your stitch density and thread weight to the letter size for best results.
- Test First: Always run a test on a scrap of your chosen fabric before committing to your final piece.
- Shorten Stitches on Curves: For both satin and fill, shorter stitches around curves keep lines smooth and prevent jagged edges.
- Pre-Treat Fabrics: Wash and press before embroidering to avoid surprises after the first laundry cycle.
Whether you’re working on a breezy cotton voile or a plush towel, these strategies ensure your embroidered letters look sharp, professional, and built to last.
5. Troubleshooting Common Letter Embroidery Issues
Even seasoned embroiderers run into trouble—thread breaks, puckering, and misaligned letters can turn a dream project into a headache. But don’t worry: with a systematic approach and a few expert tricks, you’ll be back to flawless stitching in no time.
5.1 Solving Thread Breaks and Tension Problems
Thread breaks are the arch-nemesis of every embroiderer. They halt your workflow, waste material, and test your patience. Here’s how to outsmart them:
Needle Condition
- Inspect your needle for burrs or damage—even a tiny nick can shred thread.
- Use the right size: 75/11 for most applications, or upgrade to 90/14 for thicker threads or dense fabrics.
Threading Path
- Double-check the threading—missed guides or a skipped tension disk can cause instant breaks.
- Ensure the thread passes smoothly through all guides and the break sensor wheel.
Thread Quality
- Old or poor-quality thread is a recipe for disaster. Use high-quality, machine-embroidery thread designed for speed and friction.
- Pay attention to spool type: straight-wound spools should unwind from the side, not the top.
Tension Settings
- Too tight? Thread snaps. Too loose? Loops and tangles.
- Regularly test and adjust tension, especially when switching fabrics or threads.
Machine Speed
- Slow down for tricky threads or dense designs. Some machines allow you to reduce speed for problem areas—don’t forget to reset after!
Mechanical Checks
- Inspect for burrs or scratches on the needle plate or other metal parts.
- Adjust the picker mechanism by the bobbin to prevent thread pop-outs.
Quick Diagnostic Checklist
| Problem | Primary Causes | Solutions |
|---|---|---|
| Thread Breaking | Old thread, damaged needle, threading | Replace thread, change needle, re-thread |
| Puckering | Poor stabilization, high density | Add backing, adjust tension, press work |
| Skipped Stitches | Dull needle, threading errors | Replace needle, verify threading path |
| Misalignment | Hooping issues, fabric movement | Re-hoop, check stabilization |
For Stretch Fabrics:
Referencing YouTube experts, use a ballpoint needle and adjust your stitch settings (such as zigzag or stretch stitches) to maintain flexibility and prevent breaks.
5.2 Eliminating Puckering and Alignment Errors
Puckering and misalignment can make even the best designs look amateurish. Here’s how to keep your letters sharp and your fabric smooth:
Uniform Tension
- Use high-quality hoops like Sewtalent, Hoopmaster hooping station, or MaggieFrame for garment embroidery to maintain even tension across the fabric.
- Choose the smallest hoop that fits your design for maximum stability.
Stabilizer Reinforcement
- Don’t skimp—add extra stabilizer for stretchy or plush fabrics.
- For sheers, use a lightweight, fusible stabilizer to prevent shifting.
Pressing Techniques
- After embroidery, press your work face-down on a fluffy towel to smooth out puckering.
- Avoid direct heat on the stitches—use a pressing cloth if needed.
Design Density Adjustments
- Too dense? Reduce stitch count or spacing to prevent fabric draw-in.
- For lightweight fabrics, lighten up the density; for heavy fabrics, a bit more density can help anchor the design.
Maintenance Matters
- Clean and oil your machine every 3–4 hours of stitching to prevent lint build-up and ensure smooth operation.
Letter-Specific Challenges
- Small letters are especially prone to puckering and thread breaks—use finer needles, lighter threads, and test your setup before starting.
By tackling each issue methodically, you’ll transform frustration into mastery—one crisp letter at a time.
6. Advanced Techniques: Digitization and Special Effects
Ready to take your lettering from “nice” to “next-level”? Advanced digitizing and specialty effects open up a world of creative possibilities, from custom fonts to 3D puff embroidery.
6.1 Digitizing Custom Letter Designs
Digitizing is where your creative vision meets machine precision. Here’s how to turn custom letter designs into flawless stitches:
File Preparation- Start with a clean, scalable vector file (SVG, AI, or EPS). Convert all fonts and shapes to curves for consistent results.
- Simplify complex designs—tiny details rarely translate well to stitches.
- For clarity and stitch quality, keep custom letters at least 30mm tall. Smaller fonts risk becoming illegible or losing detail.
- Import your vector into best digitizing software for embroidery, such as Wilcom or HATCH.
- Assign stitch types: satin for narrow elements, fill for large areas, run stitch for outlines.
- Adjust stitch density (typically 0.4–0.8mm for names), pull compensation, and underlay to match fabric and thread.
- For unique logos or specialty fonts, manually map out stitch paths and connections to avoid unnecessary jumps or trims.
- Use the reshape function to fine-tune angles and curves for each letter.
- Preview your design in simulation mode to catch issues before stitching.
- Always run a test stitch on scrap fabric to verify density, tension, and registration.
Pro Tip: Automated font conversion is fast, but manual tweaks ensure professional results—especially for monograms or intricate designs.
6.2 3D Puff and Specialty Thread Applications
Want your letters to pop—literally? 3D puff embroidery and specialty threads add dimension and drama to your designs.
3D Puff Embroidery- Add foam to the embroidery area after regular stitching, then use tack-down stitches to secure it.
- Choose matching thread and foam colors for a seamless look.
- Use increased stitch density to fully cover the foam and create a bold, raised effect.
- Best for large, simple letters—small or intricate fonts don’t work well with puff.
- Metallic threads add shimmer but can be delicate—use a topstitch or metallic needle with a larger eye, and lower your machine speed.
- Nylon threads are strong and durable, ideal for heavy-use items; adjust tension for a tight, secure stitch.
- Multi-needle machines allow for color changes and complex effects without manual intervention.
- For extra loft, some pros use two layers of foam and trim with a hot knife for clean edges.
- Always test on scrap fabric to perfect your density and tension.
- Remove excess foam carefully after stitching—well-digitized designs make this easy.
With these advanced techniques, your embroidered letters won’t just say something—they’ll make a statement.
Ready to experiment? Try combining these techniques and see how your machine-embroidered letters can truly stand out—on any fabric, for any purpose.
7. Conclusion: Elevating Your Letter Embroidery Mastery
Mastering machine-embroidered lettering is a journey—one that rewards patience, curiosity, and a willingness to experiment. As you’ve discovered, flawless results begin with a solid foundation: proper machine setup, thoughtful fabric and thread choices, and a deep understanding of how stitch techniques interact with different materials. Troubleshooting isn’t just a safety net; it’s your ticket to consistent, professional outcomes and less wasted time or fabric.
But don’t stop at the basics. The world of digitization, specialty threads, and advanced effects is wide open—waiting for your creative touch. Each new project is a chance to refine your workflow, boost efficiency, and push your skills further. So embrace the process, celebrate your progress, and let your embroidered letters speak volumes—one perfectly stitched word at a time.
8. FAQ: Machine Embroidery Letters
8.1 Q: Can I embroider letters without digitizing software?
A: Absolutely! Most modern embroidery machines come with built-in font libraries, allowing you to select and stitch letters directly from the machine’s menu—no extra software required. You can input text, adjust size, and align your design using the machine’s digital tools. For custom fonts or complex designs, digitizing software opens up more creative options, but it’s not a must for basic lettering.
8.2 Q: Why do my small letters look blurry or messy?
A: Blurry or messy small letters are often the result of excessive stitch density or using thread that’s too thick for the scale. To achieve crisp results, opt for a finer thread (such as 60-weight) and a smaller needle (like 65/9). Adjust the stitch density in your machine’s settings—lowering it for tiny fonts helps prevent overcrowding and distortion. Always test on a fabric scrap before committing to your final piece.
8.3 Q: How can I prevent fabric show-through behind my embroidered letters?
A: Fabric show-through is usually caused by insufficient stabilizer or low stitch density. Choose the right stabilizer for your fabric—cut-away for knits, tear-away for wovens, or wash-away for delicate materials. Reinforce with an extra layer if needed, especially on plush or stretchy fabrics. Increasing stitch density can also help, but be careful not to overdo it, as too many stitches can cause puckering.
Have more questions? Drop them in the comments or explore the rest of our embroidery guides for deeper dives and troubleshooting tips. Happy stitching!